Tips for Recording and Filming a Virtual Choir!
Life as a musician in the middle of a pandemic can mean being flexible and adapting to new methods, and this also is true for a cappella producers! While live performances (and recordings) may be on "pause" right now, there is a renewed interest in virtual choir audio and video recording.
These guidelines are suggestions for recording the best virtual choir audio and video possible. Most of this equipment should be things most singers have access to already, or it can be purchased on the cheap. If you don’t have the specific tools in these guidelines, try to your best to mimic these guidelines with what you have.
Equipment
Recording device: Smartphone (iPhone, Galaxy, Google, etc)
Modern smartphones are the best devices for this kind of project. Laptops and tablets are bigger, but smartphones are designed with better cameras today. If you have to use a laptop or tablet, make sure you frame the shots the same way you would with a smart phone.
Secondary device: Laptop, tablet, smartphone, iPod, etc
You will need a secondary device to listen to the rehearsal/recording track provided. This includes any device that will let you play an mp3, and that has a way to connect to headphones.
Listening device: AirPods, ear buds, wired headphones, etc
You will need a pair of headphones to listen to the rehearsal/recording track from the secondary device. The kind of headphone doesn’t really matter since your smartphone will record the audio. The only thing you want to take into consideration is that you will be filming, so it might be better to use headphones that are less conspicuous. Wireless headphones are great because they don’t have a cable restricting movement and can even be hidden with longer hair.
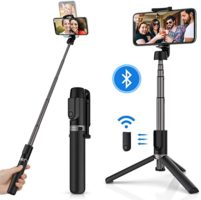 Smartphone stand/clip: Example: Yoozon Selfie Stick Tripod
While this is not necessary, it is very helpful when filming your video. It will prevent any shaking of the smart phone if you use the tripod stand and set it on a table. Amazon sells these for around $20:
Setting Up Your Phone For Recording
There are a few things to consider when setting up your smart phone for video. A couple of key things to keep in mind:
- Lighting – The quality of your video will be better if you are filming in a room with a lot of natural light. You can improve the lighting in a room with lamps/lights, but a naturally lit room is the always the best option. Try not to point the shot directly into sunlight as it could cause color balance issues for the camera.
- Framing – Always film in “landscape”. Use the camera on the back of your phone (NOT the selfie camera), as the quality of the backside camera and microphone is better on smart phones. Because you will not be using the selfie camera, you will need to do a few practice shots to get the framing correct before the final take. Otherwise, get a family member/friend to film and get you in the right place for the shot. Place the camera 3-5 feet away, or until you have a shot that gives you a few inches above your head and a few inches below your shoulders. If your chin is close to the very center of the frame, that’s a good place to be. Avoid filming up into your face, as it is not a very flattering angle. Here is an example of optimal framing and lighting for a virtual choir:

- Audio recording – If your framing looks like the picture above, then you are at a good distance to the microphone on your smart phone. You are never going to get a studio quality audio recording from a smart phone, but you can get a better quality recording if you avoid a room with a lot of extraneous noise and a lot of reflections. An optimal recording space is carpeted and “dry”, meaning it has very few echoes and reverberation from the walls. You can drape blankets over hard surfaces to prevent reverberation in the room. Avoid bathrooms, closets, hallways, and small, enclosed spaces. Another thing you can do to get better quality audio is remove your smart phone case. They tend to muffle the microphones.

Recording your video
- Load the rehearsal/recording track into your secondary device.
- Connect your headphones to the secondary device. If it is possible, use only one side of your headphones (either left or right) so that you have an open ear to hear yourself singing in the room. This will help with pitch as well as hearing any extraneous noise that might cause you to start your recording over.
- Place your secondary device outside of the frame of your shot.
- If you need to use sheet music, use a digital version (PDF). Do NOT use paper sheet music, as flipping pages will get picked up on your recording. You can view the digital sheet music on your secondary device. It is preferable to have your music memorized so that you can look directly into the camera of your smart phone and perform.
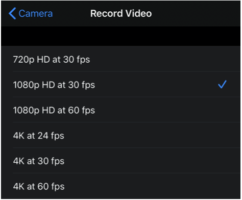
- If your recording device gives you the option to choose filming settings, set it to: 1080p HD at 30 fps. On an iPhone, click settings -> camera -> record video.
- Once your framing is correct, begin your video recording. Before you start the rehearsal/recording track on your secondary device, be sure to sit in silence for 5-10 seconds so that the video records the sound of the room. This is VERY important, as the audio engineer will need those 5-10 seconds of room noise to remove it during the editing process.
- Start the rehearsal/recording track after 5-10 seconds of silence in the room. Sing/perform your piece while looking at the camera on your smart phone. If you have to use sheet music, try your best to only sneak looks occasionally. Once the piece is done, wait 5-10 seconds before moving out of the frame of the shot.
Exporting/Sending Video
The most important part about exporting and sending your video is that you send it at its original, high quality version. Do NOT try to e-mail the video file directly from your phone to an e-mail address because most of the time your phone will compress the video file to save space. The best things to do are:
- If you have an iPhone, you can send an iCloud link with the full quality version. First find your video and then click on the share button on the bottom left. Next, click on “Copy iCloud link”. You can then paste that link on e-mail and send it.
- If your music director/conductor is collecting the videos on Google Drive or DropBox, you can do something similar. Find your video, click the share button, and then send the video to Google Drive or DropBox. If you get a message asking you to compress the file, do not do that. You need to send the highest quality video possible.
- For Mac users, you can connect your iPhone to your computer/laptop with a USB cable. The photos app will open. You can “import” the video to your computer. Once the video is imported, you can put that video in a folder of your choice on your computer by clicking File -> Export -> Export unmodified original. Once you have that physical file on your computer, you can upload the file to any free sharing website like WeTransfer, Google Drive, or DropBox.
- For PC users, unlock your phone and then connect your phone to your computer/laptop with a USB cable. On your phone, tap the “Charging this device via USB” notification. Under “Use USB for,” select File Transfer. A file transfer window will open on your computer. Use it to drag files to the location of your choice. Once you have that physical file on your computer, you can upload the file to any free sharing website like WeTransfer, Google Drive, or DropBox.